LEARN TO explore
AURIN Data Provider (ADP) and ARCGIS PRO
Please note, this tutorial has been created the new generation of GIS mapping software. For instructions related to ArcMap, please see the previous tutorial.
Tutorial Goals
Accessing AURIN data through ArcGIS Pro involves a few steps, but it is a great way to leverage powerful geographic information system (GIS) tools for your projects. Here is a breakdown of your learning process in this tutorial:
-
Understanding ArcGIS Pro;
-
Connecting to AURIN API via ArcGIS Pro;
-
Downloading data from AURIN API;
-
Dealing with larger datasets.
1. Understanding ArcGIS Pro: An Evolution from ArcMap
ArcGIS Pro, Esri’s next-generation desktop GIS mapping software, allows users to create, manage, analyse, and visualise spatial data in both 2D and 3D environments. As the successor to ArcMap within Esri’s ArcGIS suite, ArcGIS Pro encompasses a wide array of enhanced features and capabilities while offering a seamless transition for users familiar with ArcMap. This tutorial will cover the process of connecting to AURIN API and downloading data using ArcGIS Pro 3.2.1. It is worth noting that the outlined process in this tutorial will remain similar, if not identical, for other versions of ArcGIS Pro available at the time of writing.
ArcGIS Pro, like other ESRI desktop products, is solely compatible with Windows. Mac or Linux users may require virtual environments like Parallels Desktop for operation. Access solutions such as Citrix Workspace or organisational software resources can help bridge this gap. Many institutions, including universities, rely on Citrix Workspace to grant access to ArcGIS Pro across different devices. For guidance tailored to your needs, check your organisation’s website for software accessibility information.
2. Connecting to the AURIN API via ArcGIS Pro
Before commencing this step, please ensure you have generated your unique API access username and password in the Access Dashboard. If you need guidance on creating your credentials, please refer to the tutorial here.
Please note the API access password will expire in 90 days for security reasons. You can always get a new password by visiting the API Access page.
Setting up access to the AURIN API within ArcGIS Pro requires creating a new connection. To connect to the AURIN API, please follow these steps:
a) From the Insert ribbon, select Connections → Server and choose New WFS Server.

b) In the opened window, fill in the following parameters:
-
Server URL: https://adp.aurin.org.au/geoserver/wfs
-
Enter your ADP credentials for Username and Password
-
You can generate your unique ADP access credentials here.
-

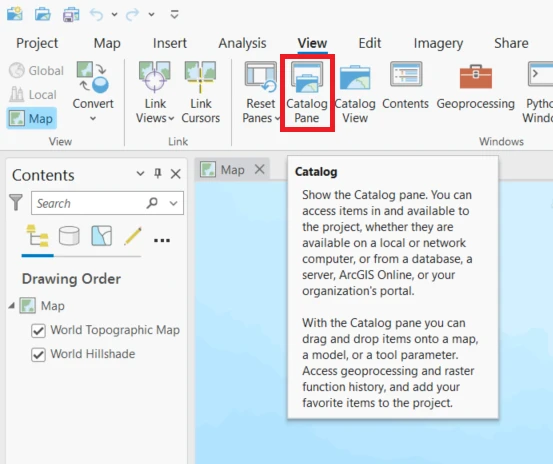
c) From the View ribbon, choose Catalog Pane to open it up.
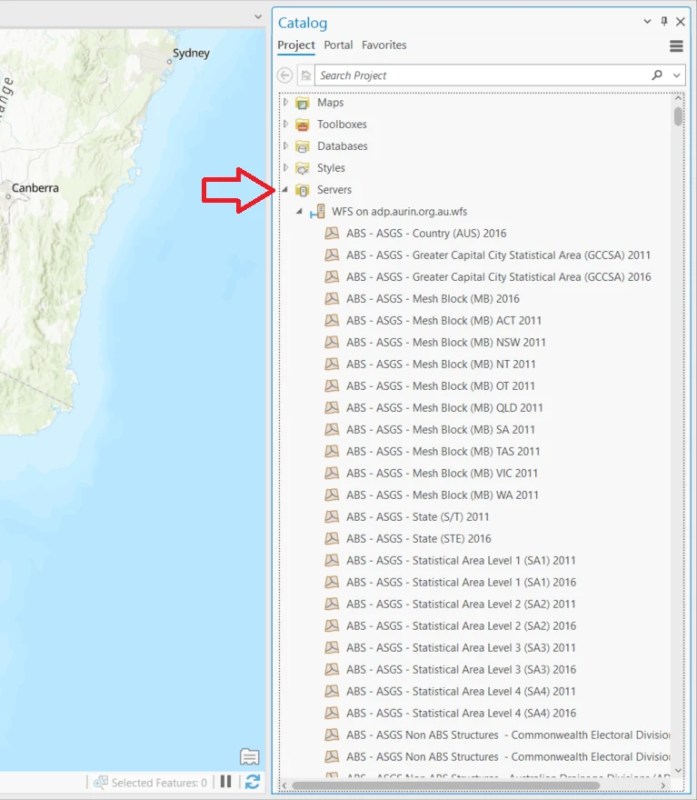
d) In the Catalog Pane, expand the Servers section by clicking on the small arrow icon ► next to it. Here, you will find your established WFS connection. Expand this connection further by clicking the arrow ► next to it again, allowing you to browse through the datasets available to you via the AURIN API.
3. Downloading Data from the AURIN API
After establishing the connection, you can view a catalogue of accessible datasets through the AURIN API. To locate a specific dataset, you can either navigate through the list by scrolling or use the Search Project box located at the top of the Catalog Pane.
As of the preparation of this tutorial, reports observed that the Search Project feature was experiencing significant delays, potentially stemming from problems in indexing project items within ArcGIS Pro. This issue might differ based on the version you are using. At this point, it is recommended to navigate through datasets in alphabetical order as a workaround.
In this tutorial, we use the ABS Building Approvals (LGA) 2020-2021 dataset, sourced from the Australian Bureau of Statistics. This dataset presents details of building works approved in Australia for the 2020-2021 financial year. Further information about this dataset can be found here.
Once you’ve found the dataset within the accessible datasets catalogue via the AURIN API, you can either right-click on the data and choose Add To Current Map or simply drag the data layer onto your map view to load it. In case you don’t have any maps open, you can choose Add To New and opt for Map to load the data in a new map viewer.

The duration of the data loading process can vary based on both the dataset’s size and your internet bandwidth. Your data should appear in the map viewer of your ArcGIS Pro session. From here you may then conduct further analysis or modification of the data.

Once the data is loaded, you can navigate, pan, zoom in, and zoom out on the map. Additionally, feature attributes can be identified by simply clicking on the corresponding feature on the map, triggering a pop-up window that displays the selected feature(s) along with their associated attributes.

4. Exporting the data
In ArcGIS Pro, you can export the loaded data into various geospatial data formats using the following built-in tools:
-
Feature Class to Shapefile: Export loaded data to a Shapefile;
-
Feature Class to Geodatabase: Export loaded data to a geodatabase;
-
Features to JSON: Export loaded data to GeoJSON;
-
Layer to KML: Export loaded data to KML;
-
Feature to Raster: Export loaded data to raster.
To access these tools, navigate to the View ribbon and select Geoprocessing. Within the menu, use the search bar to look for the desired tool. Alternatively, you can go to the Toolboxes tab in the Geoprocessing menu, expand the Conversion Tools, and find the relevant tools to convert data between different formats.

As a showcase, here we aim to export the loaded data (i.e., the ABS – Building Approvals (LGA) 2020-2021 dataset) to a Shapefile. To this end, after navigating to the View ribbon and selecting Geoprocessing, look for the Feature Class to Shapefile tool and open it.

Within the opened window, locate the small arrow next to Input Features and select ABS – Building Approvals (LGA) 2020-2021 (Step 1). Upon clicking the layer, it will be incorporated as a distinct line in the window. Specify an output path by clicking on the folder icon adjacent to the Output Folder (Step 2) input text bar. Once configured, click the Run button located at the bottom of the window (Step 3).

The completion of the process is confirmed by the appearance of a green box below the window, signalling a message that underscores the successful execution of the task. You can then locate the exported shapefile in the selected output folder.
5. Dealing with Larger Datasets
The WFS connection feature in ArcGIS Pro is primarily optimised for datasets of moderate size. When working with larger datasets, ArcGIS Pro may encounter challenges such as slow loading times or unresponsiveness. To improve the performance of ArcGIS Pro in handling substantial datasets, it is advisable to implement the following strategies:
5.1 Downloading the data directly from the AURIN catalogue
An effective workaround involves downloading the data directly from the AURIN data catalogue as a file into your local or cloud drive and subsequently loading the data into ArcGIS Pro. This approach streamlines the process, allowing for easier handling of larger datasets within the ArcGIS environment. Further information on downloading data from the AURIN data catalogue can be found here: Browse and Access the AURIN Data Catalogue – AURIN
5.2 Using Python or R
Customising your WFS connection to AURIN data is achievable through various programming languages such as R and Python. This customisation empowers you to craft tailored scripts capable of managing larger datasets. This includes the ability to download data in specific batch sizes or apply filters based on bounding boxes or other specific attributes. Explore further details on this topic through the following pages:
Other ADP User Guides:
You can download a dataset from the Data Catalogue in different ways. Further information about this is available via the following AURIN Data Provider User Guides:
GIS
Learn how to connect to the AURIN Data Provider and explore AURIN data on Geographic Information Systems.


